
Character Of The Issue – Requirements
Inverted roof insulation places waterproofing beneath thermal insulation, making moisture sealing critical. The waterproofing must adhere well, be flexible, reliable, and durable. Key advantages include:
Permanent protection of the waterproof membrane from external elements.
Easy placement and removal of insulation and ballast for inspection.
Reduced condensation issues on the “cold side” of insulation through effective ventilation.
Lower ballast load compared to cement sloped mortar construction.
SOLUTION
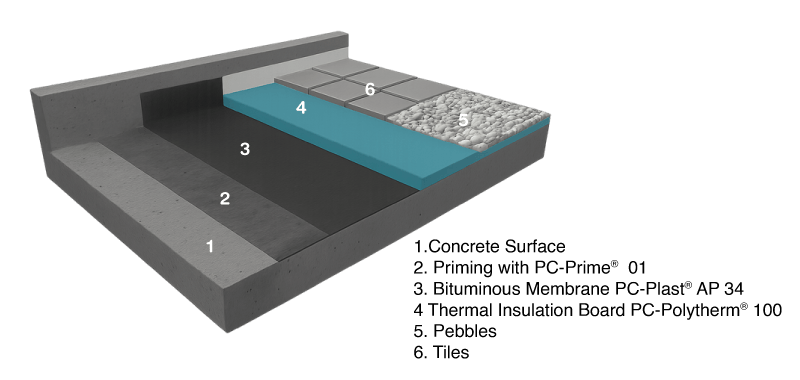
The waterproofing and inverted roof insulation requirements outlined above are thoroughly addressed by the combination of APP Bituminous Membrane PC-Plast® AP 34 and PC-Polytherm® 100. When applied to the roof, this membrane creates a robust and continuous elastic seal, exhibiting excellent adhesion and remarkable resistance to extended moisture exposure. It is specifically designed to effectively accommodate the roof’s expansion and contraction.
Application of Bituminous Membrane
Preparation of the substrate
The substrate must be dry, with a moisture content of less than 4%, and free from loose particles, dust, grease, and other contaminants. Local restorations or repairs of roof elements, such as concrete and cement mortar, should be executed using polymer-modified, fiber-reinforced PCC R3 cement mortar, specifically PC-Conrend® HS RM.
If any concrete cracks are present, they should be cut into a V-shape, and PC-Crack Seal® paste should be applied. For structural cracks that could compromise the integrity of the overall structure, the PC-WC injection repair system should be utilized.
Installation of transitional fillets and coves
Before applying the polymer-bitumen roll materials, it is necessary to eliminate all sharp protuberances, corners, etc. to avoid the material crushing or static punching of the waterproofing membrane (e.g., when filling of a foundation pit with backfilled soil and in process of operation of a building), for which it is necessary to arrange transitional fillets or coves. Fillets are usually made of cement-sand grout of at least M150 grade or polymer-cement slurry with fast strength setting. In any case, the size of fillets should be around 100 × 100 mm.
Priming the surface
When applying polymer-bitumen roll-fed materials using the torching method, it is crucial to ensure proper adhesion to the substrate, ideally achieving a range of 0.3 to 0.5 MPa. To facilitate this process, the concrete base should be primed with a ready-to-use bitumen primer coating. The expected consumption of the primer is approximately 0.25 to 0.35 liters per square meter, depending on the texture and absorbency of the substrate.
Torch-on application of the waterproofing membrane
- The surface must be thoroughly cleaned of dust, debris, grease, and leaves, ensuring it is free from gaps, cracks, or other irregularities. Prior to the installation of the waterproofing material, the surface should be treated with a primer.
- During installation, both the material and the substrate must be uniformly heated with a torch across the entire width of the roll. Additionally, areas of overlap should receive extra heating. Proper installation requires that the entire surface of the material adheres to the base, with bitumen oozing from the edges by approximately 5–10 mm.
- The membrane should be positioned at least 300 mm away from the overlaps of the underlay membrane; however, it is typically placed 500 mm away (50% of the roll width). Furthermore, the distance between different end laps of rolls must be a minimum of 500 mm.
- The overlap at the edges should be 100 mm, with a recommended overlap of 120 mm for single-layer applications of bitumen membrane. The overlap at the ends of the sheets should not be less than 150 mm. The minimum length of rolled material that can be installed is 1 m.
- The roofer should remove coarse-grained slate from the locations of the end laps of the cap sheet membrane, as this significantly hinders material adhesion. The upper side of the material (with slate) must be additionally heated with a torch at these overlay locations. Subsequently, the slate should be pressed into the bitumen using a spatula.
Application of PC-Polytherm® 100
PC-Polytherm® 100 is a premium-grade thermal insulation material composed of closed-cell rigid foam that maintains its dimensional stability and thermal efficiency over time. Engineered for demanding construction applications, it resists moisture, does not rot, shrink, or swell, and provides high mechanical strength. The enhanced thermal performance of PC-Polytherm® 100 ensures optimal energy conservation in both residential and industrial buildings. It is available with flat or L-shaped edges for precise installation and increased system durability.
Above the waterproofing membrane, the extruded polystyrene boards, specifically PC-Polytherm® 100, are positioned and secured in place by their own weight. Subsequently, these boards are covered with either geotextile or plastic linoleum.
Measure and Cut: Begin by measuring the width between the rafters. Cut the rigid boards (such as PIR or Kingspan) slightly wider than the gap to ensure a friction fit.
Create an Air Gap : If the roof is ventilated, it is essential to leave a 50 mm air gap between the board and the roof membrane to prevent moisture accumulation. To maintain this gap, you may attach timber “stop battens” to the sides of the rafters.
Install Boards : Insert the boards into the gaps until they are flush with the bottom of the rafters.
Seal Joints : Apply aluminum foil tape over all joints and gaps to establish a continuous vapor barrier and mitigate “thermal bridging.”
Installation of the Geotextile
Following the installation of the bituminous membrane, a polypropylene nonwoven geotextile, weighing 130 g/m², is laid out, ensuring the sheets overlap by 10 cm. This layer serves to protect the substrate from damage while also enhancing ventilation within the system.
DOWNLOADS
Waterproofing Solutions
Thermally Insulated Roof
